My homelab and private network are segmented by a Ubiquiti Unifi UDM Pro for security and using some features like WAN port load balancing and failover. When setting up my home lab, integrating it with cloud services like Azure can further enhance its functionality and scalability. In this article, I will guide you through the process of establishing a site-to-site Azure VPN connection between your home lab, utilizing a Ubiquiti UDM Pro, and an Azure Virtual Network.
Table of Contents
I use the Ubqiuti UDM Pro SE and am very happy with the cloud management, it’s visibility into my LAN and Wi-Fi, and the performance. I use the Azure VPN Gateway to connect certain services from Azure for testing, demo and training purposes. This is relatively easy to install and configure.

Prerequisites
Before you begin, ensure you have the following:
- An Azure account with an active subscription.
- A Ubiquiti UDM Pro device.
- A public IPv4 address for your UDM Pro. (does not need to be static)
- Basic knowledge of network configuration.
Create a Virtual Network and Subnets
To connect your home lab to Azure, you first need to create a virtual network in Azure. Here’s how you can do it using the Azure portal:
- Sign in to the Azure Portal: Go to the Azure portal and sign in with your credentials.
- Create a Virtual Network:
- Search for “Virtual network” in the search bar and select it from the results.
- Click on “Create” to open the “Create virtual network” page.
- Fill in the details:
- Resource Group: Select an existing resource group or create a new one.
- Name: Enter a name for your virtual network (e.g.,
VNet1). - Region: Select the region where you want to deploy your resources.
- IPv4 Address Space: Define the address space (e.g.,
10.1.0.0/16). - Subnet: Add a subnet (e.g.,
10.1.0.0/24namedFrontEnd)[2].
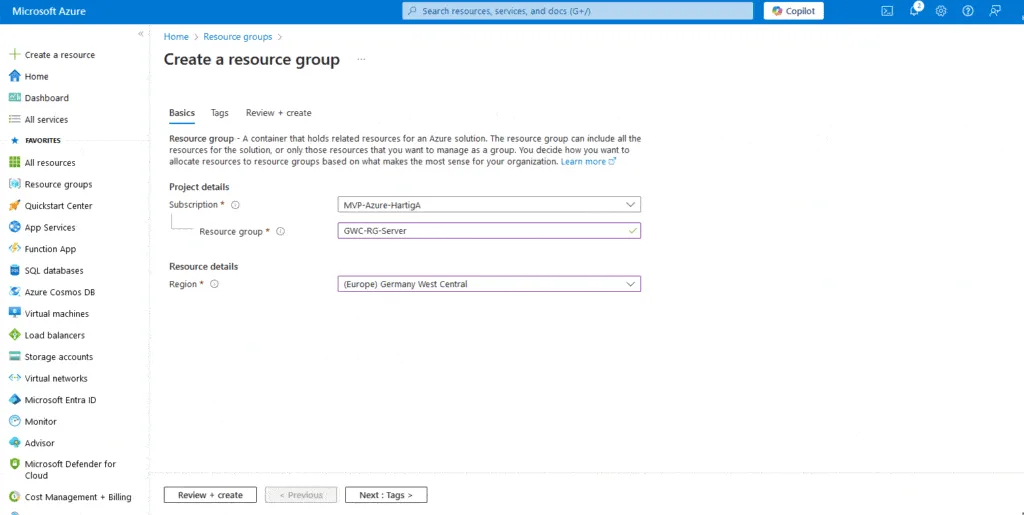
In my Azure environment I always do start with a Resource Group GWC-RG-Server (Germany West Central)
To support my Use cases I do create 4 Subnets to start with and my personal Home / HomeLab LAN design uses 10.0.0.0/8 for Azure, 192.168.0.0/16 for Home and Homelab and the 172.16.0.0/12 following guidance from RFC1918 and RFC3300:
- Default 10.0.0.0/24
- Server 10.0.2.0/24
- Gateway Subnet 10.0.3.0/24
- AzureBastionSubnet 10.0.4.0/24
To create these subnets go to https://portal.azure.com/#create/Microsoft.VirtualNetwork-ARM and configure the following.


Gather Home – HomeLab Network Details
In my Home Network I will make the networks 192.168.0.0/24, 192.168.1.0/24 and 192.168.2.0/24, so we need to have a routing in place between these networks.
Private Network 192.168.0.0/24
Server Network 192.168.1.0/24
IoT Devices 192.168.2.0/24
Establish Connection to Azure
1. Azure Virtual Network Gateway (VPN Gateway)
- Enter “Virtual network gateway” in the search bar and select it from the results.
- Click on “Create” to open the “Create virtual network gateway” page.
- Fill in the details:
- Name: Enter a name for your gateway (gwc_vpn_gateway).
- Gateway Type: Select
VPN. - SKU: Choose an appropriate SKU (e.g.,
VpnGw1). - Virtual Network: Select the virtual network you created.
- Gateway Subnet Address Range: Select the
GatewaySubnetyou created earlier GatewaySubnet (10.0.3.0/24) - Public IP Address: Create a new public IP address and set it to static.

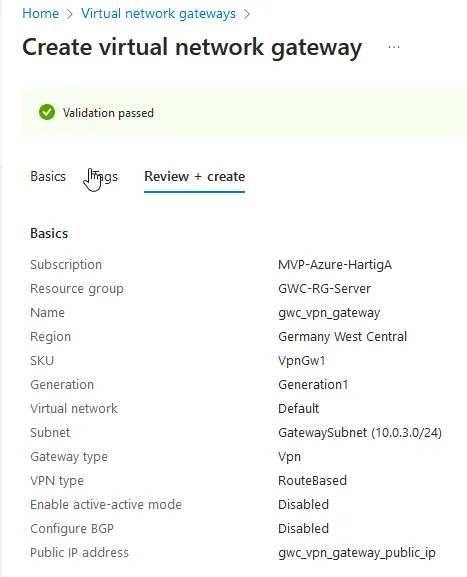
This is how the deployment will look like.

Information: Creating the VPN gateway can take many minutes. This also applies to deleting or upgrading from one SKU to another. Here you sometimes have to be patient for up to 60 minutes. An Azure VPN Gateway Upgrade process will basically backup your config, deploy a new one, restore the config. There is a service interruption included.
Important: The Azure Basic VPN Gateway is not discontinued.
The new VpnGw1 is expensive for a homelab, if you use it 24×7. Verify in the Azure Calculator and do set budgets in your Azure Portal for your homelab subscription. I recommend deploying the Basic VPN Gateway SKU using the Azure CLI.

2. Local Network Gateway
- Enter “Local network gateway” in the search bar and select it from the results.
- Click on “Create” to open the “Create Local network gateway” page.
- Fill in the details:
- Name: Enter a name for your local network gateway (gwc_local_network_gateway).
- Endpoint:
- IP Address: Enter the public IP address of your UDM Pro or
- FQDN: If you don’t have a static IP you can use services to get a Dynamic DNS Name, i.e. No Ip
- Address Space: Define the address ranges of your on-premises network (e.g.,
192.168.1.0/24)

3. Connection
- Navigate to Your VPN Gateway:
- Go to your virtual network gateway and select
Connections. - Click on “+ Add” to create a new connection.
- Fill in the details:
- Connection Type: Select
Site-to-site (IPSec). - Name: Give a name to your connection (e.g.,
VNet1toSite1). - Local Network Gateway: Select the local network gateway you created.
- Shared Key: Enter the same pre-shared key you used in the UDM Pro configuration.
- Connection Type: Select
- Go to your virtual network gateway and select

On the settings page make sure you create a secure Pre Shared Key and store that in a secure place. I do use KeepassXC for that.


4. Ubiquiti Unifi UDM configuration
In your Unifi Management Console go to network – VPN and select Site-Site VPN and configure the settings below.

VPN Method: Route based
Remote Networks: Static and enter your local (HomeLab) IPs.
Local IP: Choose your prefered WAN Interface
RemoteIP / Hostname: Check your Azure Public IP of the Virtual network gateway (gwc_vpn_gateway)
Advanced: Manual – Check the settings in the screenshow and below
Key Exchange Version: IKEv2
Encryption: AES-256
Hash: SHA1
IKE DH Group: 2
Verify Connection to Azure
In your Unifi Management Console go to network – VPN and select Site-Site VPN and you should see the following information:

In the Azure Portal check your Connection and you should see it being connected and traffic passing through.

Conclusion
Setting up the VPN from Azure via Ubiquiti always takes time if you don’t do it daily. There are many steps and an incorrect value or copy & paste error will prevent the connection. If you approach it step by step and calmly, you will get it right on the first try.
Optional Steps
Reset a gateway
If you lose cross-premises VPN connectivity on one or more site-to-site VPN tunnels, you should reset the Azure VPN gateway. In this situation, your on-premises VPN devices are working correctly but unable to establish IPsec tunnels with the Azure VPN gateways. To reset an active-active gateway, simply use the portal to reset both instances. You can also use PowerShell or CLI to reset each gateway instance separately using instance VIPs. For more information, see Reset a connection or a gateway.
In the portal, go to the virtual network gateway that you want to reset.
Add another connection
A gateway can and will have multiple connections. You cannot configure connections to multiple on-premises sites from the same VPN gateway if the address spaces overlap between any of the connections.
If you’re connecting using a site-to-site VPN and you don’t have a local network gateway for the site you want to connect to, create another local network gateway and specify the site details. For more information, see Create a local network gateway.
To add a connection, go to the VPN gateway and select Connections to open the Connections page.
Select + Add to add your connection. Adjust the connection type to reflect either VNet-to-VNet (if connecting to another virtual network gateway) or site-to-site.
Specify the shared key that you want to use and select OK to create the connection.
Update a connection shared key
You can specify a different shared key for your connection.
- In the portal, go to the connection.
- Change the shared key on the Authentication page.
- Save your changes.
- Update your VPN device with the new shared key as necessary.
Background Information
Summary Table Special Networks
Summary Table

   Address Block             Present Use                       Reference
   ---------------------------------------------------------------------
   0.0.0.0/8            "This" Network                 [RFC1700, page 4]
   10.0.0.0/8           Private-Use Networks                   [RFC1918]
   14.0.0.0/8           Public-Data Networks         [RFC1700, page 181]
   24.0.0.0/8           Cable Television Networks                    --
   39.0.0.0/8           Reserved but subject
                           to allocation                       [RFC1797]
   127.0.0.0/8          Loopback                       [RFC1700, page 5]
   128.0.0.0/16         Reserved but subject
                           to allocation                             --
   169.254.0.0/16       Link Local                                   --
   172.16.0.0/12        Private-Use Networks                   [RFC1918]
   191.255.0.0/16       Reserved but subject
                           to allocation                             --
   192.0.0.0/24         Reserved but subject
                           to allocation                             --
   192.0.2.0/24         Test-Net
   192.88.99.0/24       6to4 Relay Anycast                     [RFC3068]
   192.168.0.0/16       Private-Use Networks                   [RFC1918]
   198.18.0.0/15        Network Interconnect
                           Device Benchmark Testing            [RFC2544]
   223.255.255.0/24     Reserved but subject
                           to allocation                             --
   224.0.0.0/4          Multicast                              [RFC3171]
   240.0.0.0/4          Reserved for Future Use        [RFC1700, page 4]
Addition Links
Thomas Maurer Ubiquiti Dream Router – This was helpful with my first attempt, when the Ubiquiti Dream Router was just released
Microsoft Tutorial: Create a site-to-site VPN connection in the Azure portal