A while back i wrote a DNS guide to help you get started in your homelab. This guide is still valuable and available here. I recommend reading before you get started with this guide. We want to take things to the next level and improve our environment to be more robust, automated and provide a little bit more data privacy.
Table of Contents
Introduction – Our goals using Unbound on Windows
If you are looking for a simple solution for your homelab, that has improved apps to give other household members access, I do recommend Pi-hole and a Raspberry Pi with PiHole plus a Linux VM running on Hyper-V with Pihole in a redundant design.
While solutions like Pi-hole are popular, Unbound DNS offers a powerful recursive resolver that enhances privacy and performance. In this guide, we’ll walk through deploying Unbound DNS on Windows Server 2025, leveraging Azure Arc for management and utilizing AVMA licenses for activation.
Prerequisites for Unbound on Windows
Before we begin, ensure you have:
- Two Windows Server 2025 instance (licensed via AVMA) – Check the guide here
- Azure Arc enabled for remote management
- Winget installed for package management
I will be running the Windows Server 2025 instances on two seperates Hyper-V hosts for redundancy and stability. Keep in mind that DNS is the core functionality for every network access and the DNS performance impacts everything you do with your clients in your LAN and Internet. DNS issues are one of the most common issues, when troubleshooting connectivity issues.
Configuration for Unbound on Windows
My standard steps in this scenario include configuring the DNS Name, configure a static IP and Domain Join the server. The static IP will be important for this system as it will host DNS Services and these will not work using a static DHCP IP address with your standard DNS servers.
In my configuration I use these static IP configurations:
 IPv4 Address. . . . . . . . . . . : 192.168.0.253(Preferred)
   Subnet Mask . . . . . . . . . . . : 255.255.255.0
   Default Gateway . . . . . . . . . : 192.168.0.1
   DNS Servers . . . . . . . . . . . : 192.168.0.230
                                       192.168.0.1
The 192.168.0.230 is my primary Domain Controller required for the domain join and the 192.168.0.1 is my local Internet Gateway.
Installation of Unbound on Windows
Winget simplifies package installation on Windows. To install Unbound:
Open Terminal as Administrator. If you want a nice looking personalized version, please check my guide here.
Run the following command:
winget install NLnetLabs.Unbound
As you can see from the video above, the program is now installed to C:\Program Files\Unbound
Configuration of Unbound on Windows
There are many options to configure unbound and while you won’t need all, it is good to know there is a reference file available. For all options in the unbound.conf click here to open the official documentation.
For our scenario I recommend copying my file to your C:\Program Files\Unbound\service.conf file.
# Unbound configuration file on windows copied from https://hartiga.de
# See https://nlnetlabs.nl/documentation/unbound/unbound.conf/ for more settings # and syntax
server:
	#Allow local networks to use Unbound per RFC1918
	access-control: 10.0.0.0/8 allow
	access-control: 127.0.0.0/8 allow
	access-control: 192.168.0.0/16 allow
	# verbosity level 0-4 of logging
	verbosity: 0
	# on Windows, this setting makes reports go into the Application log
	# found in Event Viewer - Windows Logs - Application
	use-syslog: yes

	#configure network settings to use the local IP with port 5335
	#This is required to run Technitium DNS on the local server, if you
	#want to use no other local DNS server, put your local IP in interface
	#for using Unbound as your Active Directory forwarder, change port to the
	#default port 53.
	interface: 127.0.0.1
	port: 5335
	do-ip4: yes
	do-udp: yes
 	do-tcp: yes
 	# Set to no if you are not using IPv6
 	do-ip6: yes

 	#Performance Settings
 	prefetch: yes
 	num-threads: 2
 	so-rcvbuf: 1m

 	#Security Settings (DNS Rebind Prevention)
 	private-address: 192.168.0.0/16
 	private-address: 169.254.0.0/16
 	private-address: 172.16.0.0/12
     	private-address: 10.0.0.0/8

server: auto-trust-anchor-file: "C:\Program Files\Unbound\root.key"
These are basic settings for a homelab. Performance Tweaking might be needed, if you use this for a larger environment.
Restart the Windows Service using the command line
net stop unbound
net start unbound
or using the graphical user interface by using the services.msc MMC

Important: If you are configuring services and you want Automatic Restarts, I recommend configuring the following settings in the Recovery Tab. These settings will restart the service and if re-occuring even reboot the server. This does not help with configuration or software problems, but can fix a random / rare application crash.
If you encounter errors and you used my configuration above, you will see Errors in the Event Log.


Check if Unbound on Windows is running
The following command does work for all applications and is very powerful.
netstat -abThis command will show all processes running and the network ports and interfaces (ip adress) being used.

Configuration completed – Root servers basics
At this point we have configured Unbound to run as a local DNS Services to download and cache DNS information from root servers. If you haven’t heard about these basics concepts, I highly recommend reading some background available here.
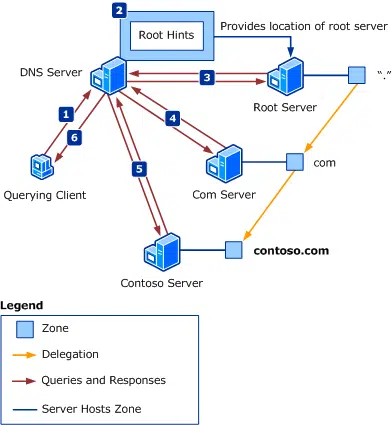
Resolving names by using root hints – Source
Next steps using Unbound in a Homelab
You can now use this unbound installation with any DNS server that you like on this box, as it is not configured for the standard TCP port 53, that needs to be client facing. We will configure two Technitium DNS Servers to use the unbound DNS service in part 2.
Considering Unbound for Small Business with Active Directory
The other option is if you want to use Unbound outside of your Homelab to connect an Active Directory to DNS at a smaller business, is to use it directly. If you do so, please make sure you do some network segmentation and firewalling. In this scenario, which I won’t cover in all details here, you should pay attention to the following:
- Use Network Segmentation and Firewalling between the Internet Zone <-> Unbound Windows Server (DMZ Zone) <-> Domain Controller (LAN)
- Do not domain join your Windows Server
- Utilize modern hardening with Windows Server 2025 using OSconfig and the standalone Baseline
If you want to learn more about OSconfig, please check the detailed blog “Using OSConfig to manage Windows Server 2025 security baselines” by Orin Thomas on the IT Ops Talk Tech Comunity or his youtube video on this topic.
Unbound and Active Directory
Important: Despite CoPilot and other recommendations, I found no registry, MMC option or command using powershell to use a non default port for DNS forwarding with Active Directory DNS Services.
So your Unbound service needs to run on a seperate server (as we did in this guide) and on port 53. If you want to use Unbound as your forwarding server to the public DNS zones, you need to change the following line in your unbound service.conf and restart the service.
interface: <put the IP of your local server here and replace 127.0.0.1>
port: 53
Once you completed the changes, you can use the Unbound server as a DNS forwarder for your Domain Controller for public DNS. This could look like this:

Conclusion
Being able to understand the basics of DNS and Unbound does give you options to configure your “personal” DNS Server to add some flexibility, network segmentation and privacy to your homelab, personal network or a small business.
There is a lot more options to further increase your privacy with unbound and we will take things to the next level with Technitium DNS in “part 2” of this guide.
Be aware that DNS is a totally underestimated part of networks and is as fundamental as understanding the network basics around tcp, udp and firewalls.
If you are interested in this topic or Adaptive cloud, please follow me on LinkedIn, Bluesky or check my newly created Adaptive Cloud community on Reddit.