Let’s create an improved version of the Technitium DNS server for Windows. Some time ago, I wrote a DNS guide to help you get started with your home laboratory. This guide is still valuable and can be found here. We will reuse quite a lot of content from that guide for this one.
Last week, I started configuring Unbound on redundant Windows servers in this post. Today, we will add the Technitium DNS Server to provide additional conditional forwarding and DNS filtering functionality for my personal network.
Table of Contents
Goal – Build a Technitium DNS Server on Windows
We want to create a DNS environment for our homelab, that does two things for us. First we want it to be able to resolve our Active Directory DNS Zone, which is ad.hartiga.de in my scenario and based on this guide here.
The solution should be as redundanent as it makes sense for us and be used by all clients, no matter if domain joined or not, to get access to ad.hartiga.de and the public internet.
The most important option for me personally, is that we want to add some level of blocking and filtering against Advertisement and tracking, while at the same time give us visibility into the system for troubleshooting connections.
Requirements
To build this environment we will use these components and skills:
- Domain Controllers and Hyper-V Hosts as explained in my Windows Server 2025 series starting here
- Unbound DNS Servers as configured in Part 1
- Basic understanding about DNS
- You are using a Ubiquiti Gateway or understand your DHCP / DNS / Gateway design enough to adopt this guide for your environment
- Download the Software from https://technitium.com/dns/
Important information – Limitations – Read First
Important: Do not install Technitium on your Domain Controller. It is recommended to use the Unbound server created in Part 1. It is highly recommended to build Technitium DNS Server on a seperate VM. My rule is 1 server for 1 service, so I can mess around and reboot without breaking too many things. This applies to my homelab and even more to my productive enviroments at customers.
Important: Internet access is required to download the initial setup and some components during installation. To reduce complexity, this is for a home lab scenario. We do not implement network segmentation or firewall functionality in this guide.
Important: Run the software and make sure you click “More Info” and “Run Anyway” to allow the software to be installed. This is not a virus warning, it is only for infrequently used software that lacks a certain visibility and is pre-approved to run. In current versions this was no longer showing for me.


Install Technitium DNS Server on Windows


Complete the installation with default settings as seen on the screenshots above. If you compare the screenshots with previous versions, you can see the quality of the ongoing software updates as the .Net versions are always current versions.
Tip: In case you have unbound installed in my part 1 guide and you get a DNS error, please change the DNS settings of your NIC back to defaults, before we finalize their setup later in this guide.
Initial Configuration to Self Host DNS
The installer will now ask to replace the current network connection with the locally running Technitium server. I do recommend to configure this now, so click “yes”. If you haven’t done it yet, please check if you have been using a static IP.

Your IP configuration on your new DNS-installed server should look something like the screenshot below, with the preferred DNS IP being 127.0.0.1. This IP is special because it always points to the local network interface, so your IP configuration will now always ask the local system (itself) for DNS resolution.
Now we can connect to the Technitium DNS Server webinterface. It can be reached on http://127.0.0.1:5380 or http://localhost:5380 in a browser on the server you just installed Technitium to or you can use “DNS Name” or “IP address” of that server with :5380 on any client in the same network.
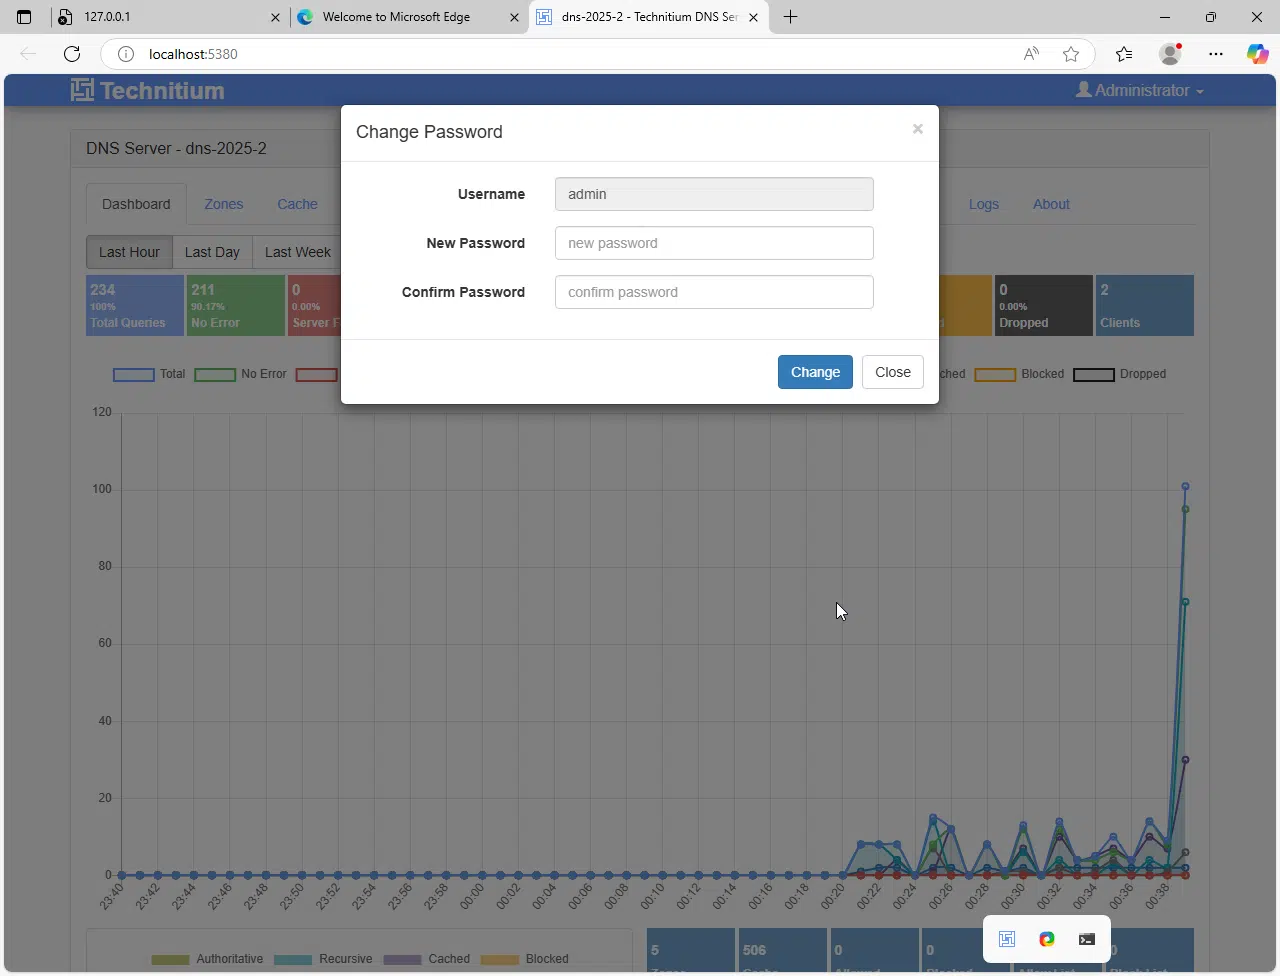
The first screen will ask for you new password. Enter it and click change. Document this password well! I highly recommend using KeePassXC for this. Your initial screen should look like this.
Configure DNS for Active Directory and Internet
At this point in time with the current configuration your Technitium DNS Server will be able to resolve DNS names in the internet using it’s defaults settings, but will have no knowledge for your local DNS names, but we want it to use the local Unbound server,
Configure Technitium with Unbound
Open the web portal and go to Settings – Proxy & Forwarders. You can keep all settings as your default and just enter 127.0.0.1:5335 in the Forwarders section.

At this point in time your Technitium DNS is configured to contact the Unbound DNS Server configured in part 1. The Unbound Server will contact the root servers and create the DNS Zones needed. The initial contact to a website can take longer than usual on the 1st try, while it will get faster from there on.
Configure Technitium for Local DNS Zones (Active Directory)
On the Technitium DNS Server we want to create the DNS forwarding for Active Directory and the devices in lan.hartiga.de. These zones will not be managed by our Technitium DNS Server, but for ad.hartiga.deby the Active Directory Domain Controller and the Unifi Gateway will manage lan.hartiga.de.
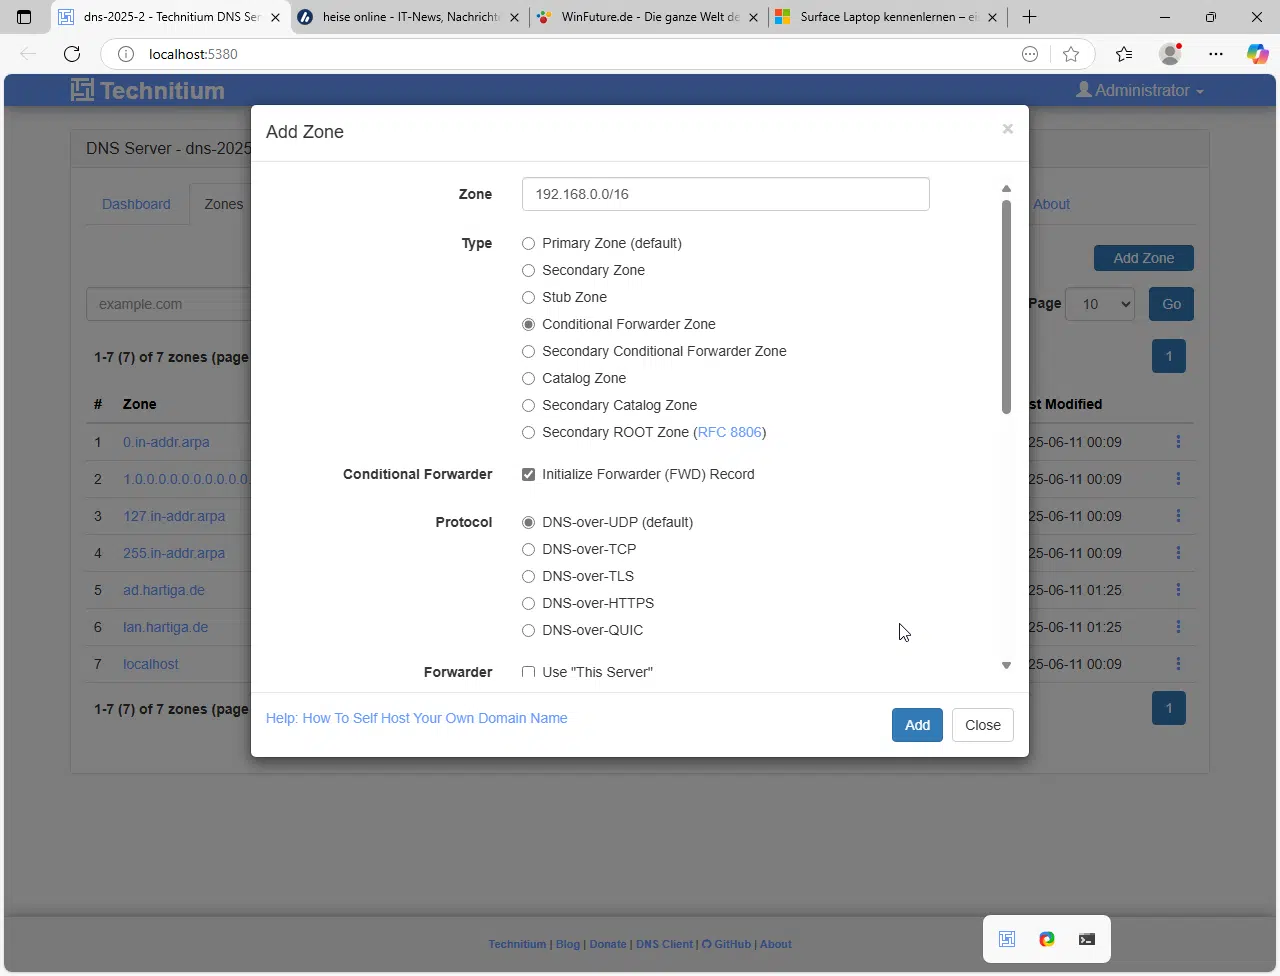
When we have these scenarios, we need to create “Forwarders” on the Technitium DNS Server. Open the webinterface as explained earlier i.e. http://localhost:5380, login with admin and click on Zones.
These are my configurations and you need to replace these with yours:
Active Directory Domain Controller IP: 192.168.0.230
Active Directory DNS name and Homelab DNS Zone: ad.hartiga.de
Unifi Network Gateway: 192.168.0.1
Unifi / Local Network for Personal Devices: lan.hartiga.de

Now your Technitium DNS Server can resolve DNS Names to the Internet (Public DNS Zones using Unbound, in your Local Area Network managed by the Unifi Gateway and also in the Active Directory. We now need to enable this functionality for all devices in our network.
Reverse Lookup Configuration
If you enjoy DNS Reverse Lookup, like I do, I do recommend adding this zone to your local server as a third zone.
Depending on where you want to maintain your “primary” list of devices you can configure the Forwarder to point to your domain controller (ad.hartiga.de) or your unifi gateway (lan.hartiga.de). Where I do prefer the Unifi Gateway as all my devices auto register there and I can configure DNS Names for IoT and network devices.
Synchronizing Settings between two Technitium DNS server
There are some scripts to synchronize Technitium DNS Servers automatically between systems running on Docker. For my HomeLab i use a simple approach as I hardly ever make changes and if I do make changes, I do like a config of the current configuration.
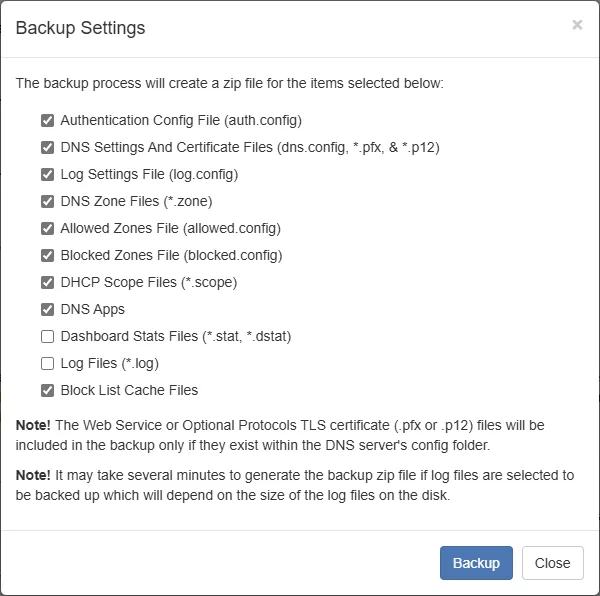
This manual approach is simple. In the Webportal go to Settings and scroll down to the button and click on backup settings on your “primary” server and copy the file to your secondary server. On your secondary server click restore settings. Make sure you select all files for backup and import, but the Dashboard Stats Files and the Log Files.
One setting needs to be manually adjusted, if you like things to be identified easily and have your “inner Monk” satisfied. After importing the file you need to go to Settings – General and change the DNS Server Domain to reflect the servername.

DNS Forwarding on your Active Directory Domain DNS Server
For Active Directory configuration we will only configure the most simple approach here. Please be aware that DNS configuration is one of the main areas for issues in networks. This becomes especially true if you work in enterprise networks with split dns or in an Azure Hybrid world with Azure Private DNS Zones and Azure Private DNS resolvers. Handling these is not in scope for this blog entry.
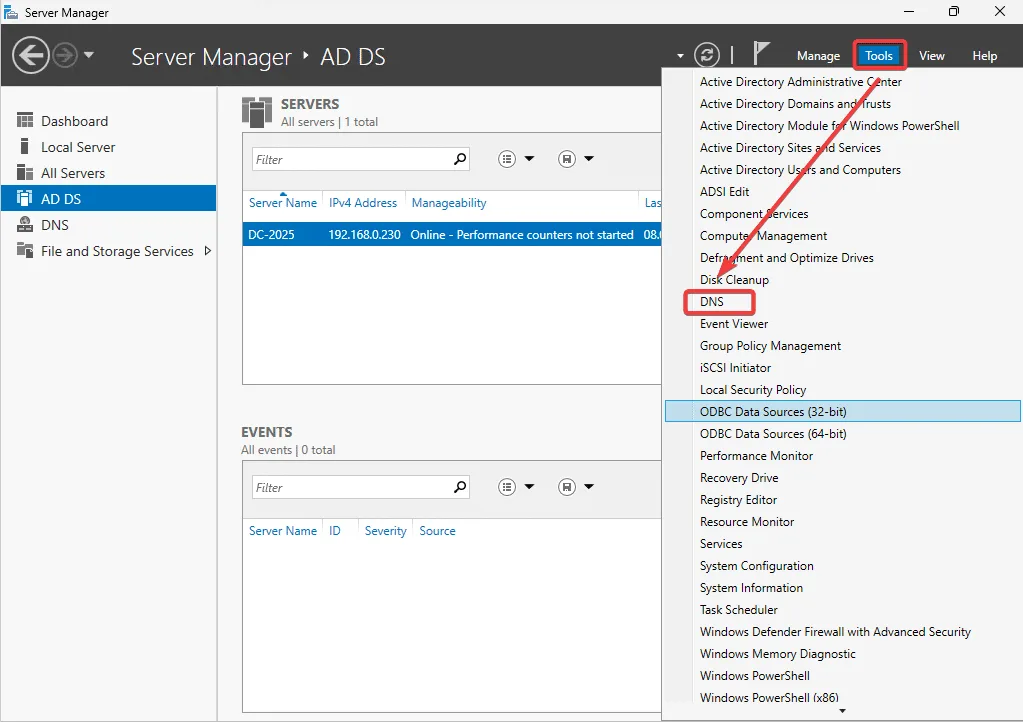
Login to your Azure Active Directory Domain and open the DNS Console. If you are not sure how to do this, it can be opened from the Server Manager on your Domain Controller.
In our scenario we want to use the two installed Technitium DNS Server for DNS resolution and the IP in my network (which you need to adjust for your network) is 192.168.0.251 & 192.168.0.252

If you are having issues please verify your network card is configured like this your domain controller:

Configuration on Ubiquiti Gateway
In this homelab we do have a Ubiquiti Unifi Gateway. The following changes to DHCP and the local DNS zone will be different for you, if you are not using such a device.
Open your network configurations on your Unifi Gateway and locate the network that you want to modify. I keep my world simple, so I have one “default” network only, but for you this might be different.

s you can see I have entered 4 DNS Servers. So any DHCP enabled Client will check for DNS requests in this order:
- Technitium DNS Server #1
- Technitium DNS Server #2
- DNS4EU DNS Server – Link -> This is my resort in case my HomeLab / Active Directory / Hyper-V is all down
- Unifi Gateway
As a last step you can now make the Technitium the default DNS Server for your Unifi Gateway. This is located in Network – Internet – “click on your connection” – DNS Server

Conclusion on Technitium DNS Server on Windows
DNS is a complex topic and even harder to master. I highly recommend to use visualizations for your environment. I shared some examples and these are simplified diagrams for DNS communication and not network diagrams.
I’d love to hear if this has helped you and what information you needed to research to get this working, so I can add that information to this article.
Message me via LinkedIn, Mastodon, Bluesky or join the Adaptive Cloud Community on Reddit.

In this blog I moved from a single DNS Server to a redundant design and added unbound as a new component to understand if and how it can run on Windows, while adding a bit of security and privacy by avoiding DNS servers from ISPs.
If you have any questions please don’t hesitate to reach out to me on LinkedIn, Bluesky or check my newly created Adaptive Cloud community on Reddit.
Recommendations for DNS Server Migrations
Thanks for reading this far. If you need to migrate DNS servers please keep the old systems running, so you can watch the logfiles and identify old servers still using them. With Technitium the view “Top Clients” view should show no devices, but localhost. If it does, start checking those devices for their DNS settings. DHCP settings for DNS Servers should normally refresh the DNS configuration after no more than 8 hours or a reboot. If systems have static IPs, they might remain on “Top clients” lists and should be fixed. In the below screenshot you would want to look at the 3 Clients in the lan.hartiga.de DNS Zone.